
How to Photograph Jewelry for Etsy: Tips That Actually Boost Sales
Learn jewelry photography techniques that increase Etsy conversions. Covers lighting for different metals, photo types that sell, and when AI tools make sense.
Your jewelry is beautiful. Your photos might be killing your sales.
According to Etsy's internal research, image quality is the single biggest factor influencing purchase decisions—more than price, shipping costs, or even customer reviews. For jewelry sellers specifically, the stakes are higher: you're asking someone to spend $50, $200, or $500 on something they can only see through a screen.
This guide goes beyond generic advice. We'll cover what actually works for Etsy jewelry photography in 2026, including lighting techniques for different metals, the exact photo types that convert browsers into buyers, and a realistic cost comparison of DIY versus professional versus AI approaches.
Why Jewelry Photography Is Harder Than Other Product Categories
Jewelry presents unique challenges that don't exist with clothing, home goods, or electronics:
Reflective surfaces everywhere. Gold, silver, platinum, and polished gemstones act like tiny mirrors. A single overhead light creates hot spots. A cluttered room reflects in every surface.
Tiny details matter. The prong setting on a ring, the clasp on a bracelet, the texture of hammered silver—these details are invisible in most photos but critical to purchase decisions.
Color accuracy is non-negotiable. If your rose gold looks yellow, or your sapphire looks purple, you'll get returns and negative reviews. Jewelry buyers expect precision.
Scale is deceptive. A ring that looks substantial in photos can arrive looking like a toy. Earrings that appeared delicate might overwhelm someone's face.
Understanding these challenges is the first step to solving them.
The 5 Photo Types Every Etsy Jewelry Listing Needs
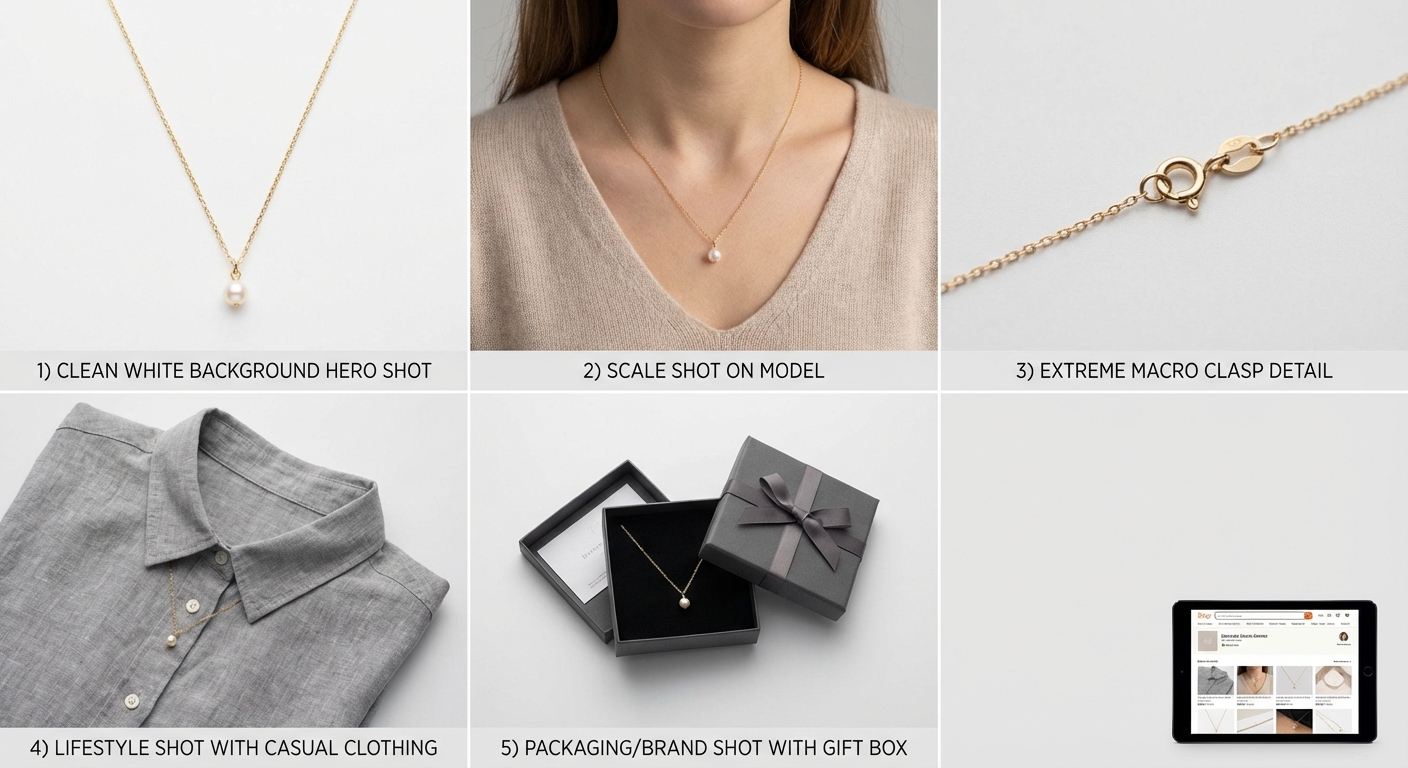
Etsy allows up to 10 images per listing. Most successful jewelry sellers use 6-8. Here's what each should accomplish:
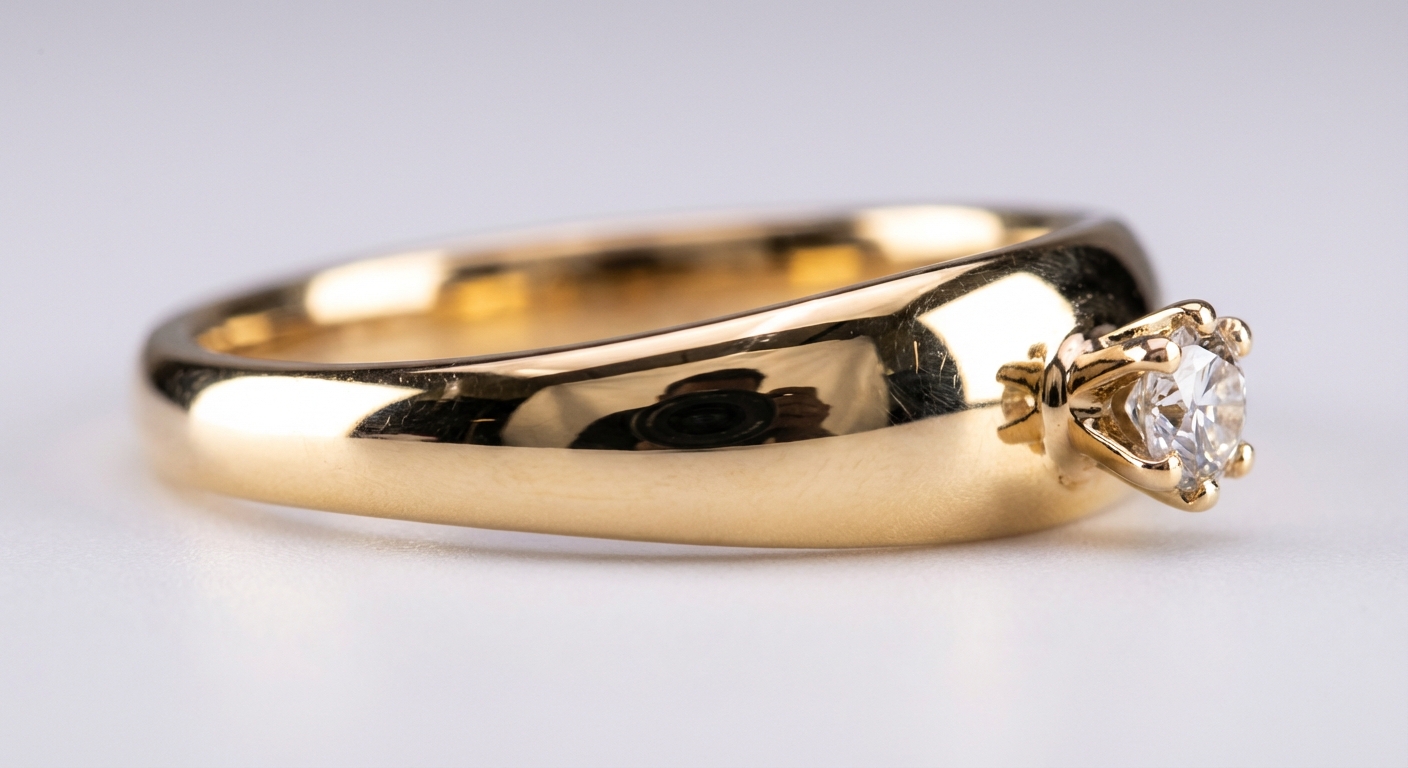
1. The Hero Shot (Primary Image)
This is your thumbnail—the image that appears in search results and determines whether someone clicks. Requirements:
- Clean white or light gray background
- Jewelry fills 80-90% of the frame
- Sharp focus on the most distinctive feature
- No props, no hands, no distractions
- Shot straight-on or at a slight angle (15-30 degrees)
Your hero shot competes against dozens of others in Etsy search. If it doesn't immediately communicate "quality" and "I want to see more," you've lost the click.
2. The Scale Shot
Jewelry sizing is the most common source of customer complaints. Solve it visually:
- Show the piece on a model (hand, ear, neck)
- Include a common reference object (coin, ruler, finger)
- For rings, photograph on multiple finger sizes if possible
A ring shot on a hand tells shoppers more in one second than any measurement in your description.
3. Detail Close-Ups
This is where macro photography (or a good smartphone portrait mode) earns its keep:
- Gemstone clarity and color
- Metal texture (polished, brushed, hammered)
- Setting quality (prongs, bezels, channels)
- Hallmarks or stamps
- Clasp mechanisms
Shoot at least 2-3 detail images from different angles. These photos build trust—they show you have nothing to hide.
4. Lifestyle Context
Lifestyle shots answer the question: "When would I wear this?"
- Casual context: jewelry with everyday clothing
- Occasion context: dressed-up styling
- Pairing context: how pieces work together
Lifestyle images help buyers visualize ownership. They're especially important for gift purchases, where the buyer is imagining someone else wearing the piece.
5. Process or Packaging Shots
Etsy shoppers value handmade and small-business stories. Show:
- Your workspace or tools (for handmade items)
- The packaging they'll receive
- Care instructions or included extras
- Your brand elements
These images don't sell the product directly—they sell trust and connection.
Lighting Setups for Different Metals and Materials
Generic advice says "use soft, diffused light." That's true but incomplete. Different materials require different approaches.
Gold (Yellow, Rose, White)
Gold is relatively forgiving because it has a warm, consistent color. The main challenge is controlling reflections.
Best approach: Two softboxes at 45-degree angles, with a large white reflector card below (to fill shadows under settings). Avoid direct overhead light, which creates harsh shadows in prong settings.
Color tip: White gold often appears slightly yellow in photos. Use a daylight-balanced bulb (5500K) and adjust white balance in post-processing if needed.
Silver and Platinum
Silver is more challenging than gold because it's more reflective and shows color casts from surrounding objects.
Best approach: Surround the piece with white surfaces (a white foam core "tent" works well). This gives the silver something neutral to reflect. A single large softbox overhead, plus white bounce cards on three sides.
Common mistake: Shooting silver near colored walls or on colored surfaces. That blue couch across the room? It's now visible in your silver ring.
Gemstones
Gemstones need light to come alive, but too much direct light kills their depth.
Transparent stones (diamonds, sapphires, emeralds): Use backlighting or side-lighting to show brilliance and fire. A small light behind or below the piece (with the main light softened in front) creates that "glow from within" effect.
Opaque stones (turquoise, lapis, opal): Front lighting with good diffusion. These stones need surface detail, not transparency effects.
Pearls: Ultra-soft lighting only. Pearls have a subtle luster that harsh light destroys. A cloudy day near a north-facing window is ideal.
Beaded and Mixed-Material Jewelry
When multiple materials appear in one piece, compromise toward the most challenging element:
- Metal + gemstone: Light for the gemstone, control reflections on metal with bounce cards
- Beads + fabric: Even, soft light to show texture without harsh shadows
- Mixed metals: Ensure lighting is neutral enough that each metal reads accurately
Camera Settings That Work
You don't need a professional camera, but you do need the right settings regardless of your gear.
For DSLR or Mirrorless
| Setting | Recommended Value | Why |
|---|---|---|
| Aperture | f/8 to f/11 | Keeps entire piece in focus |
| ISO | 100-200 | Minimizes noise in detail shots |
| Shutter speed | Whatever your tripod allows | Use a tripod and remote shutter |
| White balance | Manual or daylight (5500K) | Consistent color across shots |
Critical: Use a tripod. At f/11 and ISO 100, your shutter speed might be 1/15s or slower. Handheld shots will be soft.
For Smartphones (iPhone, Pixel, Samsung)
Modern smartphones can produce excellent jewelry photos with the right technique:
- Use Portrait mode for automatic background blur, but verify the piece stays sharp
- Lock focus and exposure by tapping and holding on the jewelry
- Use the 1x lens, not zoom—zooming reduces quality
- iPhone 15 Pro and newer: Use the 2x optical zoom for better working distance
- Turn off HDR for consistent, controllable results
Pro tip: Smartphone cameras over-sharpen by default. This can make fine details look crunchy. Shoot in raw (ProRAW on iPhone, RAW on Pixel) for more editing flexibility.
Etsy-Specific Image Requirements
Failing to meet Etsy's technical requirements means your photos won't display properly:
| Requirement | Specification |
|---|---|
| Minimum size | 2000px on shortest side |
| Recommended ratio | 4:3 (horizontal) for thumbnails |
| Accepted formats | .jpg, .gif, .png |
| Maximum images | 10 per listing |
| Resolution | 72 PPI minimum |
Thumbnail optimization: Your first image becomes the search thumbnail. Etsy crops it to a square, so ensure the jewelry is centered with space around it. If your hero shot has the piece in the lower third, you'll lose it in the crop.
The 7 Most Common Jewelry Photography Mistakes
Avoiding these errors puts you ahead of 80% of Etsy jewelry sellers:
1. Shooting on Busy Backgrounds
That reclaimed wood surface looks rustic and on-brand, right? Maybe. But if the grain pattern competes with your delicate chain necklace, buyers don't know where to look.
Fix: White, light gray, or simple solid colors. Save the styled shots for secondary images.
2. Inconsistent Lighting Across Listings
If some pieces look warm and others look cool, your shop appears unprofessional. Buyers subconsciously trust consistency.
Fix: Batch your photography. Shoot all pieces in one session with identical lighting.
3. Dirty or Tarnished Pieces
That fingerprint on the silver? That dust speck on the gemstone? The camera sees everything.
Fix: Clean every piece immediately before shooting. Wear cotton gloves. Keep a microfiber cloth on your shooting table.
4. Wrong Depth of Field
A ring shot at f/2.8 might have the top in focus and the band blurry. Artistic? Maybe. Useful for commerce? No.
Fix: f/8 or higher for full-piece sharpness. Save shallow depth of field for creative lifestyle shots.
5. No Sense of Scale
"The necklace is 18 inches" means nothing until I see it on a neck.
Fix: Include at least one worn shot per listing.
6. Over-Editing
Heavy saturation, extreme sharpening, and obvious background removal halos make jewelry look cheap.
Fix: Edit for accuracy, not drama. The piece should look exactly like what the customer will receive.
7. Shooting in Direct Sunlight
Direct sun creates harsh shadows and hot spots on reflective surfaces. It also shifts color throughout the day.
Fix: Indirect natural light (near a window, not in it) or controlled artificial lighting.
Cost Comparison: DIY vs Studio vs AI
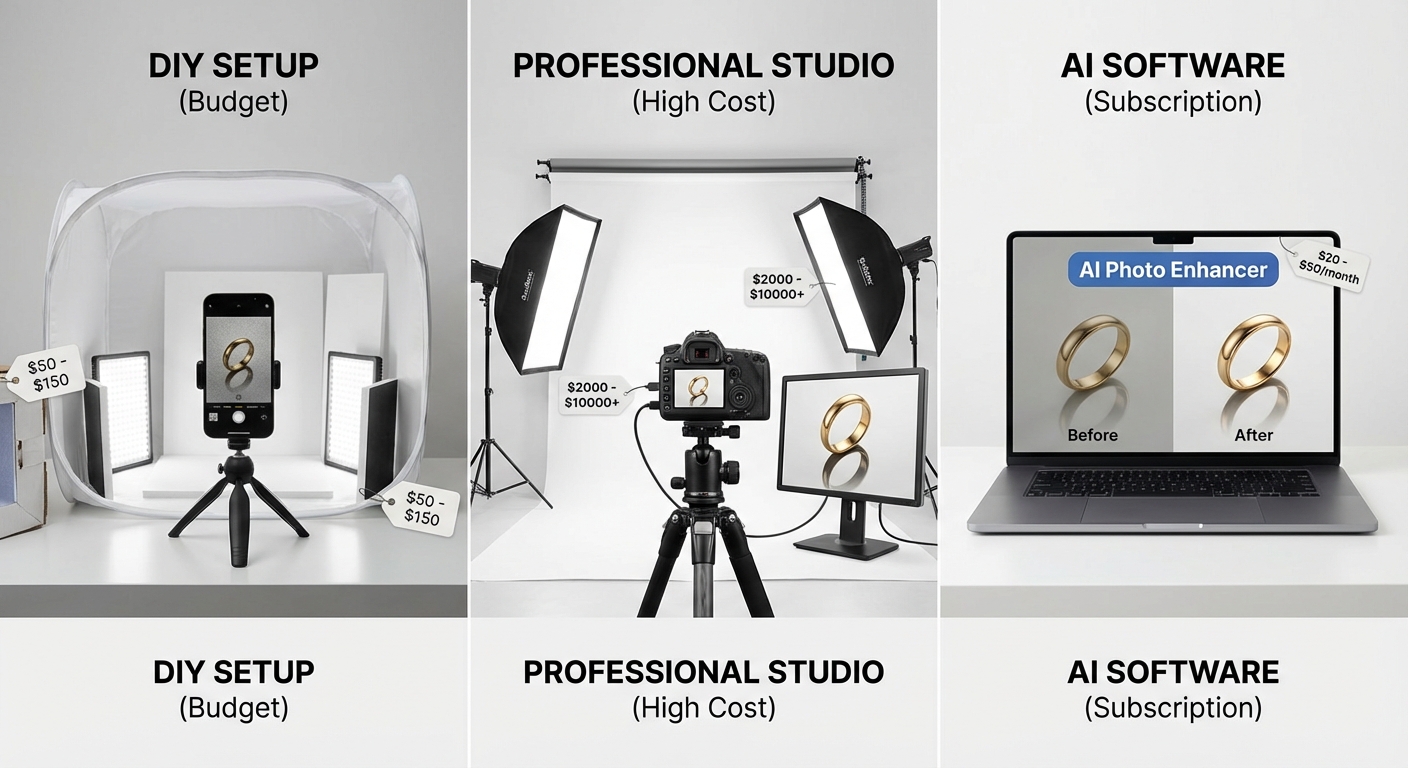
What's the realistic investment for quality Etsy jewelry photos?
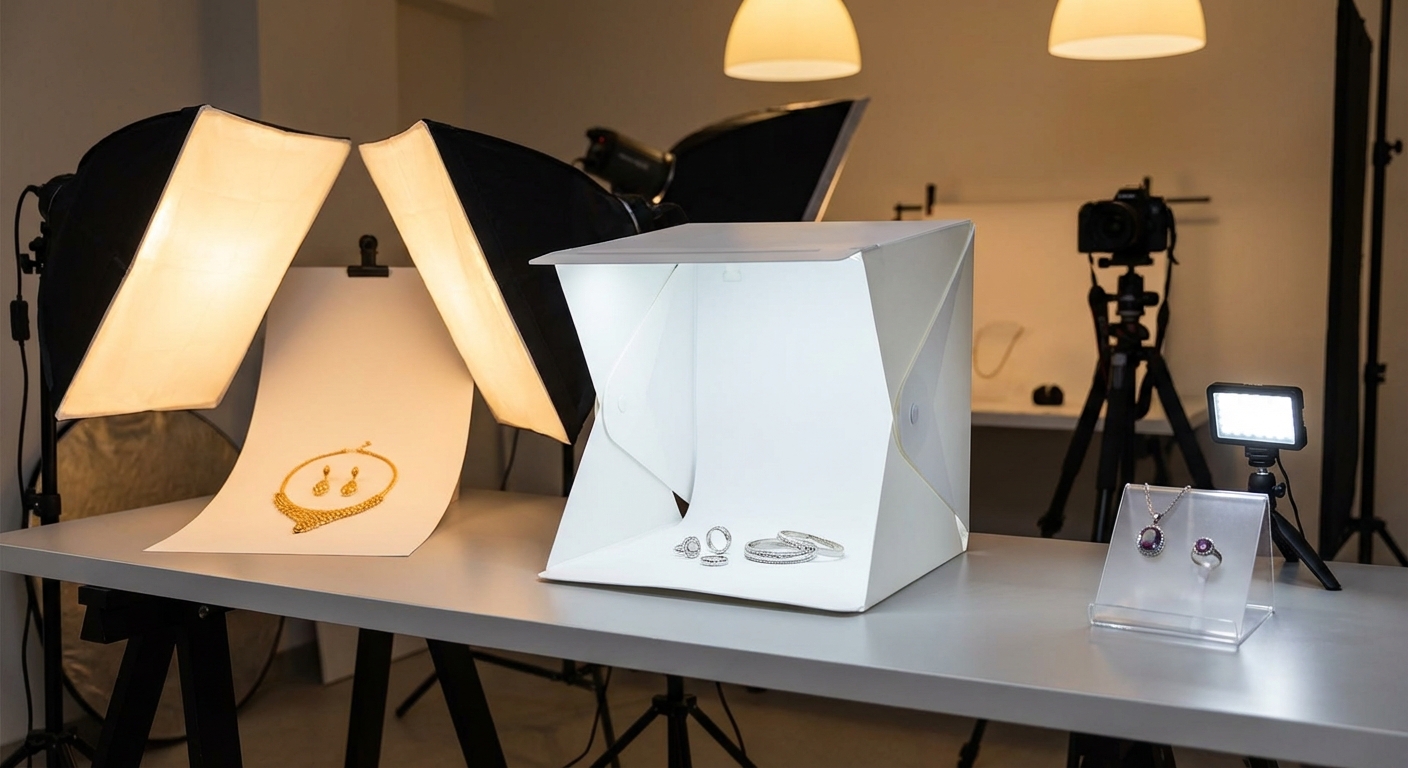
DIY Setup (Budget: $100-$400)
| Item | Cost |
|---|---|
| Smartphone (already own) | $0 |
| Foldable light tent | $25-50 |
| LED panels (2x) | $50-100 |
| Small tripod | $25-40 |
| White foam boards | $10-20 |
| Editing app subscription | $10/month |
Time cost: 15-30 minutes per piece once you have a system.
Best for: Sellers with small inventories (under 50 SKUs) who enjoy the process.
Professional Studio ($50-200 per piece)
Hiring a professional product photographer eliminates the learning curve but costs significantly more:
- Basic white-background shots: $50-75/piece
- Styled lifestyle shots: $100-200/piece
- Full 5-10 image sets: $150-400/piece
Best for: High-value pieces (over $300) where investment makes sense, or sellers who hate photography.
AI Product Photography Tools ($0-50/month)
AI tools like Pixtify have changed the economics of product photography. Take one decent photo of your piece, and AI generates:
- Professional white backgrounds (instant, consistent)
- Multiple angles and compositions
- Lifestyle contexts without hiring models
- Batch processing for large inventories
Time cost: 2-5 minutes per piece.
Best for: Sellers with larger inventories, those needing consistent styling, or anyone who wants professional results without the photography learning curve.
Where AI shines for jewelry: Background replacement and consistency. Jewelry shot on a kitchen table can be instantly placed on a clean studio background. Every listing looks professional without every photo being perfect.
The right choice depends on your volume, budget, and whether you enjoy the photography process. Many successful sellers use a hybrid: DIY for basic shots, AI for backgrounds and consistency, professional studio for hero images on flagship pieces.
Quick-Start Checklist
Ready to improve your Etsy jewelry photos? Work through this list:
- Clean and polish every piece before shooting
- Set up consistent lighting (natural indirect OR controlled artificial)
- Use a tripod or stabilized surface
- Shoot 5-8 images per piece (hero, scale, details, lifestyle)
- Check that the thumbnail crop works
- Verify color accuracy against the physical piece
- Ensure file sizes meet Etsy's 2000px minimum
- Batch shoot multiple pieces in one session for consistency
The Real Secret
The jewelry sellers who succeed on Etsy aren't necessarily the best photographers. They're the ones who:
- Make their photos good enough to not be a barrier
- Stay consistent across their entire catalog
- Keep improving over time
Your first batch of photos won't be perfect. Neither was anyone else's. What matters is that each piece looks professional enough to be trusted—and that every piece in your shop looks like it belongs to the same brand.
Start with the basics, refine your process, and let your actual jewelry do what it does best: sparkle.
Need to photograph more jewelry with less time? Try Pixtify free — turn one photo into a complete product shoot with AI-powered background replacement and styling.
Pixtify Team
AI Product Photography
Ready to transform your product photos?
Join thousands of sellers using AI to create professional product images in minutes.
Get Started FreeNo credit card required